Have you ever looked at your attic and wondered if it could be more than just a storage space? Attic remodeling offers a unique opportunity to unlock the potential of this often neglected area in your home. By transforming your attic into a functional and stylish living space, you can not only add valuable square footage but also enhance the overall appeal and value of your property. Before embarking on this exciting endeavor, it’s crucial to have a comprehensive understanding of the costs involved, design considerations, and expert tips. In this in-depth guide, we will take you on a journey through attic remodeling, equipping you with the knowledge you need to make informed decisions and create the attic of your dreams.
Section 1: Understanding Attic Remodeling Costs
Attic remodeling costs can vary significantly based on various factors. To help you navigate this aspect effectively, let’s break down the main expenses you need to consider:
1.1. Structural Assessment and Preparation: Ensuring Safety and Integrity
Before diving into any remodeling project, it’s essential to conduct a thorough structural assessment of your attic. This assessment ensures the safety of the space and helps identify any necessary repairs or reinforcements. Depending on the complexity of the job, the cost of a structural assessment can range from $500 to $1,500.
1.2. Insulation and Ventilation: Creating Comfort and Energy Efficiency
Proper insulation and ventilation are vital for creating a comfortable and energy-efficient attic space. Upgrading insulation and ventilation systems typically falls within the range of $2,000 to $5,000, depending on the size of your attic and insulation requirements. Investing in these aspects will pay off in the long run by reducing energy costs and maintaining a pleasant environment.
1.3. Flooring, Walls, and Ceilings: Setting the Foundation for Transformation
Transforming your attic into a functional space involves carefully selecting and installing appropriate flooring, walls, and ceilings. The cost of these elements depends on the materials chosen, with average expenses ranging from $4,000 to $8,000, including labor. Choosing durable and aesthetically pleasing options will contribute to the overall quality and appeal of your attic.
Section 2: Design Considerations and Tips
Having explored the cost breakdown, let’s now delve into design considerations and expert tips that will maximize your attic’s potential:
2.1. Natural Light and Windows: Embracing Openness and Aesthetics
Introducing natural light into your attic creates an open and inviting atmosphere. Consider installing skylights or dormer windows to not only enhance the aesthetic appeal but also make the space feel more spacious. Capitalizing on natural light will transform your attic into a welcoming sanctuary.
2.2. Multifunctional Storage Solutions: Optimizing Space and Organization
Attics often offer excellent storage opportunities. Incorporating built-in cabinets, shelves, or hidden storage compartments can maximize functionality while keeping the space clutter-free. Careful planning and utilization of storage solutions will ensure that your attic remains a versatile and organized living area.
2.3. Plumbing and Electrical Considerations: Turning Dreams into Reality
If you envision your attic as a bedroom or a bathroom, it’s crucial to consider plumbing and electrical installations. Consult with professionals to assess the feasibility and budget for these additions. Proper planning and expert guidance will help you transform your attic into a fully functional and comfortable living space.
Section 3: Attic Remodeling Ideas
When it comes to attic remodeling, the possibilities are endless. Here are some exciting improvement projects that can take your attic transformation to the next level:
3.1. Dormers: Enhancing Space and Architectural Appeal Dormers are a popular choice for attic remodeling projects. These structures extend from the existing roofline, creating additional headroom and allowing for more natural light and ventilation. Dormers not only enhance the functionality of your attic but also add architectural charm to your home’s exterior. Consider incorporating dormers that complement your home’s style and maximize the usable space in your attic.
3.2. Sun Tunnels: Bringing Natural Light to Windowless Attics If your attic lacks windows or has limited access to natural light, sun tunnels can be a game-changer. Sun tunnels, also known as tubular skylights, capture sunlight from the roof and channel it into your attic through reflective tubes. This cost-effective solution brings abundant natural light into windowless areas, making the space feel brighter and more inviting.
3.3. Built-in Bookshelves and Reading Nooks: Creating a Cozy Retreat Transform your attic into a cozy reading haven by incorporating built-in bookshelves and comfortable reading nooks. Utilize the sloped ceilings and alcoves to create intimate spaces where you can curl up with a good book. Consider adding built-in seating, plush cushions, and adequate lighting to make your reading nook a cozy retreat within your attic.
3.4. Home Office Setup: Maximizing Productivity and Functionality With remote work becoming increasingly popular, having a dedicated home office space is essential. Convert your attic into a productive workspace by adding a desk, storage solutions, and ergonomic seating. Make use of the natural light available or incorporate task lighting to create a well-lit and inspiring environment that promotes focus and productivity.
3.5. Guest Bedroom Retreat: Providing Comfortable Accommodations If you frequently host overnight guests, transforming your attic into a guest bedroom can be a wonderful addition. Install a comfortable bed, storage for guests’ belongings, and thoughtful amenities like a small sitting area or a private bathroom if space allows. Ensure proper insulation and ventilation to guarantee your guests’ comfort throughout their stay.
3.6. Entertainment and Media Center: Creating a Home Theater Experience Turn your attic into a personal entertainment sanctuary by creating a home theater or media center. Install a large-screen TV, surround sound speakers, comfortable seating, and acoustic treatments to enhance the audio and visual experience. Consider incorporating blackout curtains or blinds to control light and create an authentic theater atmosphere.
Remember to consult with professionals and consider your specific needs and budget when choosing among these attic remodeling ideas. Each project can be tailored to suit your preferences and the available space, allowing you to create a truly personalized attic transformation.
Attic remodeling provides a unique opportunity to unleash your creativity and customize your living space according to your needs and desires. Whether you opt for dormers to enhance architectural appeal, sun tunnels to bring in natural light, or any other improvement project, the key is to envision how you want your attic to function and then bring those ideas to life. With careful planning, expert guidance, and a touch of innovation, you can transform your attic into a functional, stylish, and highly valued space within your home. Embrace the possibilities, and enjoy the journey of creating the attic of your dreams.
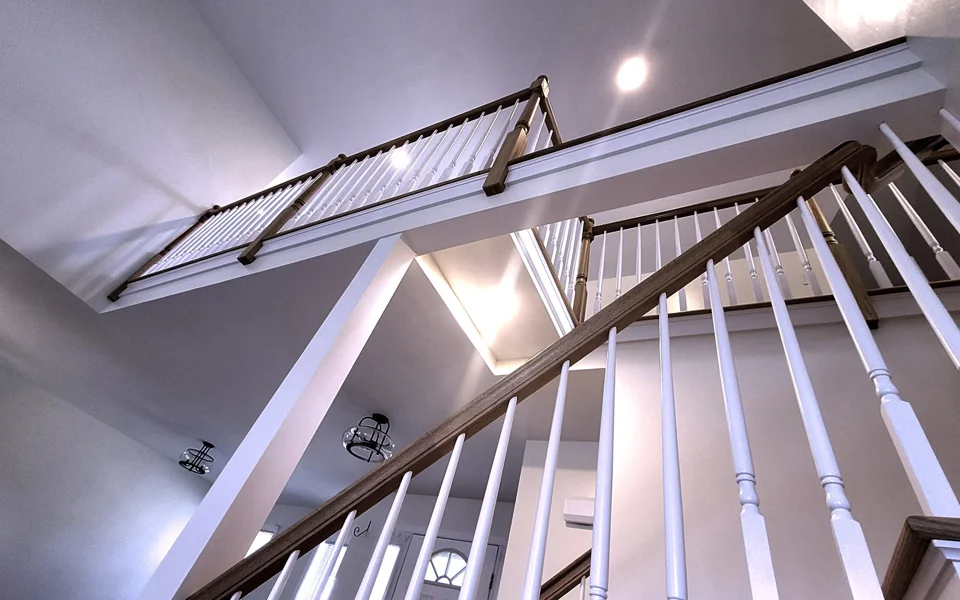
Frequently Asked Questions:
Being your own GC can work for smaller jobs, but for major renovations it’s wise to hire a professional to handle the complex details. The money spent is often saved through their expertise. If you want more control than a GC allows, look for a construction management company.
Interview several contractors and ask for client references and examples of past work. Make sure they have the experience, manpower, and vision to execute your specific project. Personality fit is also important.
Handymen are best for minor electrical, plumbing, carpentry, painting, and other basic home projects. Bigger remodeling jobs like room additions are better left to contractors even if a handyman says they can do it.
You can definitely hire a design-build firm for a kitchen overhaul, but a general contractor or construction manager working with an architectural designer can also execute this well. Design-build makes the most sense for whole home renovations, larger kitchen renovations, and those looking to minimize costs.
You can be relatively hands-off with an experienced general contractor. But it’s still wise to check in on progress regularly and be involved in big decisions to ensure quality and prevent miscommunications.
General contractors take on the actual construction work for your project either themselves or using subcontractors they oversee. Construction managers act in an advisory role to help plan, coordinate, and manage the project rather than doing the physical building work.
Main steps are design, permitting, contractor selection, financing, demolition, foundation/framing, roofing, utilities, interior finishings and inspections.
Yes, using an architect, designer, and contractor within the same firm eases communication difficulties and makes managing your project easier.
Depending on scope, an addition often takes 4-6 months with larger additions over 6+ months. Make sure your contractor provides a detailed timeline. Waiting on permits and materials can drastically increase the time required.
Being your own GC can save money but requires extensive time and knowledge. Most advise hiring a qualified general contractor to manage your remodel or addition. If you want more control over your project than a GC allows, a Construction Management company may be a better fit.
Demanding full payment upfront, no written contract, no fixed pricing, high pressure sales tactics, lack of license and insurance are red flags.
Hire an architect to create preliminary drawings for the addition layout, look and feel. They can also help with permitting and contractor selection.
A contractor can assess if your home’s structure, foundation, roof, siding etc. can support an addition. Zoning laws also determine allowed addition size.
Common permits include building, electrical, plumbing, mechanical, zoning approval. Your contractor will usually pull the needed permits, but check with your local permitting office.
Yes, it’s recommended to get quotes from 3-4 contractors to compare pricing and visions for the project. Make sure all bids cover the same scope of work.
Key questions include their years of experience, examples of past work, license and insurance info, project timeline and communication style. Always check references too.
The cost to add on a room can range from $10,000 to $150,000 depending on the size and features. Factors like permitting, foundation work, plumbing and HVAC can significantly impact the final cost. Rooms with plumbing and electrical such as bathrooms and kitchens tend to be more expensive than adding a bedroom or office.
Most towns in Connecticut require a permit to install a pellet stove, but pellet stoves are less regulated than traditional wood stoves since they produce fewer emissions. Check ordinances for your specific state and town.
Electric fireplaces just need occasional cleaning to keep the viewing glass free of dust and debris. This prevents obstructing the realistic flame effects.
Maintain at least 36 inches between combustible furnishings and the fireplace opening. Leave at least 6 feet clearance from a wood stove or other heating appliance.
Fireplace installation costs range from $3,500-$5,000 on average for a basic model. Luxury custom builds with high-end finishes can run $15,000 or more.
Yes, masonry fireplaces usually require a dedicated concrete foundation to adequately support their weight. Integrate these specifications early into design plans.
Tile, stone, brick, or other masonry flooring withstands radiant heat best. Adding a decorative rug over hearth flooring protects friends and family from potential burns.
Add pocket doors, frosted glass panels, louvre doors, or pendant lighting features to open passageways. Valances, shelving displays, or transom windows above eye level also add separation.
If your kitchen has an adjacent dining or living room with the possibility to remove the dividing wall(s), a pass-through can likely be added. Your contractor will determine viability.
Pros of a pass-through kitchen include an open, airy layout, easy communication between rooms, multi-purpose functionality, and seamless entertaining.
Consult with roofing specialists experienced in historical restoration before replacing an antique roof. Often repairs, selective replacement of damaged areas, and added structural supports can preserve the roof’s integrity and historical design.,
Prepare a pool for storms by lowering the water level, chemically treating the water, and shutting down electrical equipment. Install a pool cover tightly secured by water tubes or weights. Remove deck furniture and secure chemicals, pumps, and filters.,
To prepare a dock for storms, secure all loose items and equipment, install extra dock lines and anchors, attach flotation devices, and ensure electrical lines and equipment are unplugged and protected from surges.
Yes, protect stained glass windows during storms by covering them with plywood panels screwed into the window framing. Use closed cell foam weatherstripping to seal the edges before storm winds arise.,
Basic upgrades like grab bars and Lever handles cost a few hundred dollars. Full accessible bathrooms start around $15,000. Extensive whole home remodels range from $50,000-$100,000+.
Avoid slippery floors. Opt for matte finish hardwood, low-pile carpets, slip-resistant tile, sheet vinyl, or vinyl plank floors.
Simplify the environment. Use familiar furnishings. Install good lighting. Provide ample visual cues and reduce clutter that causes confusion. Secure potentially dangerous items.
Focus on one-floor living, non-slip flooring, grab bars, wheelchair/walker friendly doorways, an accessible bathroom, and a private suite with bedroom and sitting area.
Each town sets its own mill rate based on budget needs, property values, services provided, and other sources of revenue. Wealthier towns can keep rates lower.
Connecticut has the 3rd highest effective property tax rate behind New Jersey and Illinois.
Homes are assessed at 70% of market value. This assessed value is multiplied by the town’s mill rate to get the annual property tax bill.
A mill rate is the amount of property tax charged per $1,000 of assessed home value. It’s expressed in mills, with 1 mill equaling $1 in taxes per $1,000 of value.
General contractors take on more responsibility for delivering the entire project within a guaranteed budget and timeline. Construction managers act more as advisors, with the homeowner retaining overall control.
Their fees are usually 10-20% of the total construction budget. The exact rate depends on the scope of work and services provided. Expect to pay more for larger or more complicated projects.
It works well on larger, more complex renovations and custom projects where the homeowner wants to be very hands-on with decision making. It may be overkill on smaller jobs.
The main benefits are having more control over contractor selection, scheduling, and project decisions, while still getting oversight and coordination from a construction expert. This can result in greater efficiency and potentially some cost savings.
Expect to pay at least $1000-2000 for a medium-sized kitchen, just for labor and materials. Costs go up significantly for larger kitchens.
Most refinished cabinets show noticeable wear, fading and damage after just 1-2 years of use. Factory finishes last 5-10 times longer under normal kitchen conditions.
In most cases, replacing kitchen cabinets is only marginally more expensive than refinishing them, and gives you longer-lasting results. Factor in long-term costs, and replacement provides a better value.
Don’t turn your heat fully off in winter since freezing pipes can burst. Set the temperature to around 55°F to prevent damage while saving energy.
Change air filters monthly during heavy winter usage. Clogged filters make systems work harder. Choose pleated filters for cleaner winter air quality. Proper sizing is key.
Winter prep includes pruning trees/bushes, planting cold-hardy plants, applying winter mulch, disconnecting hoses, draining irrigation, and bringing potted plants and delicate furniture indoors or under cover.
Prioritize doors, windows, attic hatches, electrical outlets, dryer vents, pipes, wiring holes, and exterior joints/cracks where siding materials meet. Use high quality caulk then paint over if needed.
Insulating attic floors is best to prevent heat loss through the ceilings below. Lay batts between joists or blow in loose fill cellulose. Roof insulation is less common but also effective.
Prevent ice dams by keeping gutters clean, removing overhanging branches, and installing gutter guards or heat cables along vulnerable roof edges. Ice dams should be removed professionally.
The Department of Energy recommends setting the thermostat to 68°F while home in winter to balance comfort and energy efficiency. Lower to around 55°F when away or sleeping.
Choose an oven at least 45-60cm (18-24 inches) wide to comfortably fit a 12-14 inch pizza. Larger ovens allow you to bake multiple pizzas at once.
Focus on workflow, adequate counterspace, durable surfaces, ventilation, high BTU burners, and refrigeration for ingredients.
Prices range widely from $300 for entry-level consumer models to $10,000+ for professional-grade pizza ovens. Built-in brick ovens cost $10,000 to $25,000 installed.
It’s recommended to hire a professional installer, especially for wood-fired ovens which require chimney venting. Freestanding ovens are easier for DIY.
While customization is possible, Home Depot contractors tend to recommend standardized material packages. You may need to pay extra fees for highly customized options.
For any complex wiring or plumbing needs, your general contractor may subcontract licensed electricians and plumbers. Be sure to ask who will handle this work.
No, securing any required building permits is the homeowner’s responsibility. Your contractor can provide guidance on permit requirements based on your project scope.
Home Depot typically expects you to purchase materials through them if using one of their contractors. However, you may be able to negotiate the use of some specialty or reused items. Discuss this with your project manager.
Installing a sump pump, sealing the walls, adding flood vents, and installing a French drain system around your home will all help keep water out of your basement when heavy rains hit.
Metal, clay tile, and impact-rated asphalt shingle roofs perform best in high winds. Lightweight metal allows wind to pass through, reducing uplift forces.
Reinforcing the roof, securing windows/doors, bracing the foundation, and controlling water flow are job one. Doing these things helps prevent total structural failure when a big storm hits.
Total price varies a lot based on which upgrades you pick. But plan on at least $10K-$20K to tackle the essentials like roof bracing, storm windows, and waterproofing.
Removing walls looks airy initially, but it reduces usable cabinet and counter space. Traffic patterns in wide open floorplans can also be problematic. Putting walls back later means major construction. Unless the layout works well long-term, more modest updates are often wiser.
Granite requires regular sealing to prevent stains and cracks, which is an inconvenience. The polished stone also shows wear and marks easily. And the speckled pattern that’s currently popular may start to feel dated after a number of years.
Will painting my house exterior in fall cause issues?
Fall provides ideal conditions for exterior paint with lower humidity, cooler temperatures, and less rain providing proper curing and less chance of blistering. Prepare surfaces thoroughly and use top-quality paints.
Inspect gutters, downspouts, and roofing. Seal driveways and exterior wood surfaces. Insulate pipes, attics, and walls. Install storm windows. Trim trees away from home. Test HVAC systems. Perform chimney cleaning.
Late summer through fall provides ideal weather conditions for most home improvement projects in Connecticut. September and October see moderate temperatures, less humidity, and lower rainfall before winter arrives.
Yes, the structural, electrical and plumbing work involved requires qualified architects, designers and contractors. Be sure to get all needed building permits.
Yes, this luxury addition can increase resale value significantly. Home buyers view it as an appealing entertaining-friendly feature.
$40,000-$60,000 is typical, with costs varying based on size, finishes, appliances added and any electrical/plumbing work or structural changes needed. Expect to spend about 550$ per square foot.
GFCI outlets have a built-in safety switch that cuts power if there is risk of electric shock. These protect against electrocution and should be installed in bathrooms, kitchens, laundry rooms and other wet areas.
Costs vary based on the size of the home and extent of the work needed. Rewiring a 2,000 square foot home often costs $8,000-$15,000. Upgrading the panel and adding new circuits may cost $2,000 or more.
No, old fuse box systems should be upgraded to modern circuit breaker panels for safety. Circuit breakers help prevent overloads better than fuses.
Signs include frequently tripped breakers, flickering lights, odd burning smells from the electrical system, outlets that don’t hold plugs, and buzzing sounds from wiring.
Some of the most common electrical issues in old Connecticut homes are frayed, outdated wiring; overloaded circuits; faulty electrical panels; and not enough circuits to meet modern electrical demand.
Yes, an updated, high-end kitchen with smart layout and finishes can greatly increase your home’s value and appeal to buyers.
Yes. A second dishwasher keeps clean dishes available while others wash and provides extra capacity when entertaining large groups. A secondary dishwasher focused on glassware is perfect for home bars.
Quartz and granite are top choices. Quartz offers a high-end look with less maintenance. Granite provides a rich, unique aesthetic at a lower pricepoint. Other common choices include butcher block, laminate, and corian.
Winter and early spring are ideal as contractors may have more availability. Summertime leads to higher demand. Discuss timing with your contractor.
Stock cabinets cost less but offer limited sizes and finishes. Custom lets you customize the design, dimensions, materials and features. Assess your budget and design goals.
Open concept kitchens that integrate cooking, dining, and family living spaces are very popular. Islands for extra prep space and casual dining are also in demand. Prioritizing workflow is key.
The cost for a luxury chef’s kitchen remodel in Connecticut typically ranges from $75,000 to $150,000 depending on the size, materials used, and custom features. High-end appliances, fixtures and finishes will drive up the budget.
Current mortgage rates are very similar for both new construction and existing homes, averaging around 7% for 30-year fixed rate loans as of August 2023. Shop multiple lenders for the best deals.
Home renovation financing options include cash-out refinances if you have enough home equity, HELOCs for flexibility, and FHA 203(k) renovation loans that combine purchase and upgrades.
Financing options for new builds include conventional mortgages and construction loans. Construction loans cover the full building phase and convert to permanent mortgages.
Pros of renovating a home include cost savings on purchase price, a choice of established neighborhoods, vintage architectural details, and lower cost with DIY renovations.
Cons of new construction include higher cost, potentially limited inventory, unknown neighborhood over time, and possible construction delays. Brand new homes also lack the character of older homes.
Excellent options for small spaces include sleek wall-mounted fireplaces, corner fireplace units, low-profile linear fireplaces, or electric fireplace inserts.
Look for high AFUE ratings of 90% or more for maximum efficiency in gas fireplaces. Wood fireplaces with advanced combustion can also be very efficient. Modern ethanol biofuel fireplaces are ventless and eco-friendly.
Custom luxury fireplaces average $5,000-$15,000 installed but can exceed $30,000 for premium materials and extensive customization. Get quotes from 3-4 licensed installers.
Top hotels often opt for Mendota, Heat & Glo, or Napolean luxury gas fireplaces known for reliability, customized beauty, and realistic flames.
Look for solid wood furniture with zero-VOC finishes. Avoid composite woods that may contain glues with formaldehyde.
Low-VOC and zero-VOC paint options like milk paint or plant-based paints release far fewer fumes. Always let all paints fully cure before occupying spaces.
Natural materials like solid wood, wool, cotton, hemp and linoleum tend to have lower VOC and formaldehyde emissions. Look for Greenguard certified low-VOC products.
Ideally 6-8 months prior. This gives adequate time to create designs, get permits, order materials and line up contractors. Rushed timelines can result in mistakes.
Kitchen designers focus specifically on kitchens rather than whole homes. Many have training in kitchen workflow, storage, appliances and construction considerations.
Costs range from hourly rates around $100-250/hour, flat fees from $1,500-$5,000, or 10-20% of the total kitchen remodel budget for full service.
While not required, a designer can be helpful for larger or more complex projects, or if you need guidance making style and layout decisions. They help ensure it’s done right.
It’s best to hire a designer early in the planning process so they can help establish an overall vision, layout and budget. They can have the biggest impact during the design phase.
A kitchen designer creates a layout and aesthetic vision for the space, selects finishes like cabinetry and materials, produces construction drawings, and can provide project management during renovations.
Start by measuring the available space and determining your storage needs. Sketch layout options like L-shaped, U-shaped or a central island. Select storage like drawers, shelves and rods to hold your specific items. Add special details like mirrors, lighting and seating to complete your vision.
Avoid anything that can damage clothing, like appliances that give off heat. Chemical cleaners and air fresheners also don’t mix well with clothes. Store bulky oversized items elsewhere. Only keep essentials inside the closet to maximize space.
The cost of a walk-in closet can vary greatly. A small DIY closet might cost $10,000. On the high end, lavish custom walk-ins with luxury finishes can cost over $100k. The average cost to hire a contractor for a custom closet is around $40,000.
Experts recommend a minimum of 6 x 8 feet for a functional walk-in closet. However, the ideal size is 8 x 10 feet or larger, especially for a master suite. The space depends on your room dimensions and needs.
You can verify licensing by checking with your state contractor’s licensing board. Make sure the license is current, valid for the type of work required, and associated with the business name the contractor provides. The State of Connecticut license verification site is available at https://www.elicense.ct.gov/
10-35% is typical for a downpayment to cover material costs. Reputable contractors will not ask for full payment until the job is complete and you are fully satisfied.
Many Schluter products, including Ditra and Kerdi, come with a limited lifetime warranty. This protects against defects for as long as you own your home when installed per Schluter’s guidelines. See schluter.com for full warranty details.
Yes, Schluter’s Kerdi membrane is specially designed for steam room applications. When installed according to Schluter’s recommendations, the waterproofing ability of Kerdi prevents moisture damage and allows for stress-free steam shower usage.
Since Ditra waterproofs the entire assembly, routine maintenance is minimal. Use pH neutral cleaners on tile surfaces. Any damaged grout joints should be repaired as needed to prevent moisture access. Seal grout lines annually with a penetrating sealer.
Yes, Schluter products like Ditra and Kerdi waterproofing membranes can be installed on vertical and horizontal surfaces. Proper installation techniques should be used for each type of application.
The most reliable and popular sump pump brands include Zoeller, Wayne, Liberty Pumps, Glentronics, Schluter Systems, Little Giant, Superior Pump, and Pentair. Key factors to compare are power, durability, noise level, efficiency, warranty, and suitability for your home’s specific needs and pumping requirements. Leading brands like Zoeller and Liberty Pumps are known for robust construction and reliable performance. Do research to choose a trusted brand well-suited to your home’s needs.
ump installation costs typically range from $500-$1500 depending on the type of pump, labor time, pit size, discharge line, added materials, location accessibility, and overall complexity. More advanced projects with high-capacity pumps, long exterior discharge lines, or multiple pumps needed for large properties can cost $2000-$4000 or more. Obtain quotes from professionals to understand precise costs based on your home’s specific requirements.
To confirm your sump pump is working properly, listen for humming and check for water flowing out the discharge pipe when the pump turns on. Examine that the float moves freely to activate the pump and the water level in the pit goes down after pumping. Also ensure the discharge line is clear, backup pumps are operational, and the pit smells dry. Contact a professional if you have any concerns about abnormal smells, water remaining in the pit, or lack of pump activation during wet conditions.
A sump pump removes water from the sump pit before it rises to problematic levels. When water rises beyond a certain level on the pump, a switch is activated to automatically engage the pump and dry out the sump pit. By pumping water away from the basement, it prevents moisture damage to belongings, flooring, walls, frameworks and other structures.
Cleaning a stone tile backsplash requires gentle care to avoid damaging the natural stone surface. Here’s a step-by-step guide:
- Prepare a gentle cleaning solution: Mix a few drops of mild dish soap or stone-specific cleaner with warm water in a bucket or spray bottle.
- Remove loose dirt: Use a soft cloth or sponge to gently remove any loose dirt or debris from the surface of the stone tile backsplash.
- Clean the tiles: Dip the cloth or sponge into the cleaning solution and wring out any excess liquid. Wipe the stone tiles in a gentle, circular motion, paying attention to any stained or dirty areas. Avoid using abrasive materials or harsh cleaners that can scratch or etch the stone surface.
- Rinse with clean water: After cleaning, rinse the stone tiles thoroughly with clean water to remove any soap residue or cleaner.
- Dry the surface: Use a clean, dry cloth or towel to gently dry the stone tile backsplash. This step helps prevent water spots or streaks from forming on the surface.
- Seal the stone (if necessary): Depending on the type of stone used for the backsplash, it may benefit from periodic sealing to protect against stains. Refer to the manufacturer’s guidelines or consult a professional to determine if sealing is recommended and how often it should be done.
Yes, it is possible, but not recommended, to install an artificial stone backsplash over existing tile. Proper surface preparation is crucial for a successful installation. The existing tile should be clean, dry, and in good condition. The surface may need to be roughened or primed to ensure proper adhesion of the artificial stone. It is recommended to consult with a professional or follow the manufacturer’s instructions for the specific artificial stone product being used to ensure a proper and durable installation.
Yes, it is possible to paint a stone backsplash. However, it is important to note that painting stone requires careful preparation and specific paint products designed for stone surfaces. It is recommended to consult with a professional or research proper techniques to ensure a successful and long-lasting painted stone backsplash.
Ceramic finishes are generally more budget-friendly compared to natural stone finishes, making them an excellent choice for cost-conscious homeowners.
Yes, natural stone finishes require regular sealing and specific maintenance to preserve their beauty and protect them from stains.
Both ceramic and natural stone finishes require proper installation techniques. Improper installation can damage your surfaces and tiles, decrease their lifespan, and create additional complications. It is recommended to consult professionals for optimal results.
While smaller repairs are often best handled by a handyman or smaller contracting team, bathroom remodels are multi-faceted projects that often require input from carpenters, plumbers, electricians, and interior designers. For this reason, we always recommend hiring a general contractor for full-room remodels. Hiring a management company such as a General Contractor ensures your project has the adequate oversight needed without you having to handle the intricacies of managing the project.
Aside from the obvious aesthetic appeal, bathroom remodeling comes with a host of benefits. It can increase the value of your home, improve energy efficiency, and enhance overall functionality. Plus, who doesn’t want a bathroom that makes them feel like they’re in a luxury hotel? A well-designed and renovated bathroom can elevate your daily routine and provide a sanctuary for relaxation.
According to Zonda Media, Bathroom Additions and Remodels are some of the most financially sound renovations to make to a home. For every dollar spent on a midrange bathroom remodel, you can expect to recoup between 33 and 58 cents at the time of sale. This puts the average cost recouped on a bathroom remodel between 30 and 60 percent, depending on the level of finish and quality.
Open shelving can be practical in a small kitchen. It provides easy access to frequently used items and can visually expand the space. However, it requires regular organization and may not be suitable for all storage needs.
lear the countertops of unnecessary items and keep only essential appliances. Utilize vertical space with wall-mounted storage. Consider installing a pull-out cutting board or collapsible countertop extensions to create additional workspace when needed.
Consider galley kitchens for narrow spaces, L-shaped kitchens for corner areas, and one-wall kitchens for studio apartments or open floor plans. Each layout offers efficiency and space optimization.
Utilize vertical space with wall-mounted shelves and hooks. Invest in drawer organizers and use the inside of cabinet doors to hang items. Make the most of every inch by maximizing storage solutions.
Slimline dishwashers, narrow refrigerators, and compact ovens are great options for saving space in a small kitchen. Consider appliances designed specifically for smaller spaces to maximize functionality.
Use light colors, reflective surfaces, and open shelving to create a sense of openness. Additionally, adequate lighting and eliminating clutter can contribute to a more spacious feel.
Fine Home Contracting is one of Connecticut’s largest 203k contractors. For other options, we recommend checking 203kcontractors.com.
FHA203k Renovation Loans can be used for a variety of property types, including single-family homes, multi-unit properties (up to four units), and condominiums. However, the property must meet certain eligibility criteria, such as being the borrower’s primary residence or an investment property.
The installation time for a curbless shower depends on various factors, such as the size of the shower and the complexity of the remodel. On average, it may take around 5-7 days for a professional to complete the installation, depending on factors such as demolition needs.
When selecting a showerhead for a curbless shower, consider a handheld or adjustable-height showerhead that can be easily reached by individuals in wheelchairs. Look for ADA-compliant options with user-friendly controls.
The cost of remodeling a bathroom with a curbless shower can vary based on factors like the size of the bathroom, the materials used, and the complexity of the remodel. On average, it can range from $10,000 to $45,000, but it’s best to get a personalized estimate from a contractor.
The cost of installing a curbless shower can vary depending on several factors, including the specific design, materials used, and the extent of modifications required. While the initial installation cost may be slightly higher compared to traditional showers, the long-term benefits and enhanced accessibility they provide often outweigh the initial investment. Additionally, curbless showers can increase the value of a home and may be eligible for certain financial assistance programs or grants that support accessibility renovations.
Yes, it is possible to install a curbless shower in an existing bathroom. However, the feasibility of the installation depends on various factors such as the bathroom layout, plumbing configuration, and the availability of sufficient space. Consulting with a professional contractor or designer is recommended to assess the suitability of your bathroom for a curbless shower installation.
The installation process for grab bars and handrails can vary depending on the complexity of the project. Simple installations, such as adding a grab bar to a bathroom wall, can often be done with basic tools and DIY skills. However, for more complex installations or if you’re unsure about the process, it is recommended to consult a professional contractor or handyman to ensure proper installation and safety.
Grab bars and handrails should be installed in areas where individuals may require support or stability, such as bathrooms, staircases, and hallways. In bathrooms, they are commonly placed near toilets, bathtubs, and showers. Staircases should have handrails on both sides for balanced support, and hallways can benefit from grab bars for additional stability.
Yes, the Americans with Disabilities Act (ADA) provides guidelines for grab bar and handrail installation in public buildings. While these guidelines are not mandatory for private residences, they can be a helpful reference when installing grab bars and handrails in your home.
While it is possible to install grab bars and handrails yourself, it is important to follow proper installation techniques and ensure that the grab bars and handrails are securely mounted. Depending on your warranty, you may be required to hire a professional. If you are unsure about the process, it is recommended to hire a professional to install them for you.
- Maximizing storage in a small bathroom is essential for maintaining functionality and organization. Consider incorporating space-saving solutions such as wall-mounted cabinets, floating shelves, or built-in niches. Utilize vertical space by installing tall cabinets or shelving units. Additionally, choose multifunctional fixtures like vanities with built-in storage or mirrored medicine cabinets. Customizing storage solutions to fit your specific needs and utilizing clever organizational accessories can help maximize storage in a small bathroom.
Yes, it is possible to remodel a bathroom on a budget. There are several cost-saving strategies you can employ, such as focusing on cosmetic updates rather than extensive structural changes, opting for affordable yet stylish materials, and repurposing existing fixtures when possible. Working with a professional contractor who understands your budget constraints can help you make the most of your resources and find creative solutions to achieve your desired bathroom remodel within your budget.
The need for a permit for your bathroom remodeling project depends on the extent of the renovations and local building codes. Minor cosmetic changes such as replacing fixtures or updating finishes may not require a permit. However, if you’re making structural changes, altering plumbing or electrical systems, or adding square footage, a permit may be necessary. It’s best to consult with your local building department or a professional contractor to determine the permit requirements for your specific project.
The cost of a bathroom remodel can vary greatly depending on factors such as the size of the bathroom, the extent of the renovations, and the materials chosen. On average, a mid-range bathroom remodel can cost between $20,000 and $30,000, while a high-end remodel can range from $30,000 to $60,000 or more. It’s recommended to consult with a professional contractor to get an accurate estimate based on your specific project requirements.
The duration of a bathroom remodeling project can vary depending on the scope of work, size of the bathroom, and any unforeseen complications. On average, a bathroom remodel can take anywhere from 2 to 6 weeks. However, it’s important to note that larger or more complex projects may take longer to complete.
The cost of hiring an interior designer in Avon, CT can vary depending on several factors such as the scope of the project, the experience and reputation of the designer, and the complexity of the design. On average, interior designers in Greenwich charge between $75 and $200 per hour or may offer package rates for specific projects. Flat rates can range from as low as $500 to as high as $5,000 or more.
The duration of a home renovation project in Avon, CT depends on various factors, including the size and complexity of the project, the availability of materials, and the contractor’s schedule. Smaller projects like bathroom renovations or kitchen updates can typically take a few weeks to a couple of months, while larger-scale renovations, such as whole-house remodeling, may take several months or more. It’s crucial to discuss the estimated timeline with your contractor during the planning phase to get a better understanding of the specific duration for your project.
Whether you need an Interior Designer for your remodel depends on factors such as project complexity, design expertise desired, space optimization needs, budget considerations, and time/stress management preferences. An Interior Designer can provide valuable assistance in coordinating complex projects, ensuring cohesive design, maximizing space functionality, managing budgets, and alleviating the burden of decision-making and project management. Their expertise can result in a professionally curated and aesthetically pleasing space while potentially saving money and time. Ultimately, hiring an Interior Designer is a personal choice based on the desired outcome and the level of professional guidance and convenience desired during the remodeling process.
The duration of a home renovation project in Greenwich, CT depends on various factors, including the size and complexity of the project, the availability of materials, and the contractor’s schedule. Smaller projects like bathroom renovations or kitchen updates can typically take a few weeks to a couple of months, while larger-scale renovations, such as whole-house remodeling, may take several months or more. It’s crucial to discuss the estimated timeline with your contractor during the planning phase to get a better understanding of the specific duration for your project.
The cost of hiring an interior designer in Greenwich, CT can vary depending on several factors such as the scope of the project, the experience and reputation of the designer, and the complexity of the design. On average, interior designers in Greenwich charge between $75 and $200 per hour or may offer package rates for specific projects. Flat rates can range from as low as $500 to as high as $5,000 or more.
While it is possible to hire a contractor who is not familiar with 203k loans, it is advisable to work with a contractor experienced in handling such projects. Contractors who have prior experience with 203k loans understand the unique requirements and processes involved, which can help prevent delays and ensure a smoother renovation experience. Their expertise can also contribute to accurate cost estimates and adherence to FHA guidelines, reducing the risk of complications during the project. We always recommend using an FHA certified 203k specialist with good references.
A wide range of renovations can be financed through a 203k loan. Eligible improvements include structural repairs, room additions, kitchen and bathroom remodels, energy efficiency upgrades, and accessibility modifications. However, luxury improvements that are not considered necessary for the property’s functionality, such as a swimming pool or a tennis court, are generally not eligible for financing.
The duration of the renovation process with a 203k loan can vary depending on the complexity of the project and the contractor’s efficiency. On average, it may take several months to complete the renovation, including the time required for planning, obtaining permits, and carrying out the construction work. Working closely with your contractor and maintaining open communication can help ensure a smooth and timely renovation process.
Contractors working on a 203k loan project are paid through a specific payment process. Once the loan is approved, funds are typically held in an escrow account. The contractor submits invoices for completed work, and after verification, the lender releases funds to pay for the completed portion of the renovation. It’s crucial for contractors to keep accurate records, provide necessary documentation, and adhere to the agreed-upon payment schedule.
The cost of hiring a contractor for a 203k loan renovation can vary depending on factors such as the scope of work, location, and contractor’s rates. While it’s true that 203k contractors may charge higher fees due to their expertise in handling these specialized loans, it’s essential to consider the benefits they bring. They are experienced in navigating the complexities of 203k loans, ensuring compliance with FHA guidelines, and managing the renovation process efficiently.
Yes, it is possible to act as your own contractor on a 203k loan. However, it’s important to note that being your own contractor requires extensive knowledge of construction and project management. Additionally, you will need to meet the FHA guidelines for self-contracting, provide detailed plans and cost estimates, and assume full responsibility for the project’s successful completion.
While CAPS does not provide financial assistance for home modifications, there are several programs available that can provide financial assistance or grants for such modifications. Your CAPS professional can help you identify these programs and assist you in the application process.
Hiring a CAPS professional offers several benefits. These professionals have specialized training in understanding the unique needs of older adults, ensuring that modifications are both safe and aesthetically pleasing. They can help you achieve your aging in place goals while also increasing the value of your home. Using a CAPS certified contractor may also make you eligible for grants and cost reduction programs related to CAPS.
CAPS professionals can make a variety of modifications to your home, including installing grab bars and handrails, widening doors, installing stairlifts or elevators, improving lighting, and creating accessible bathrooms. These professionals are trained to provide modifications based on your unique needs and preferences.
Aging in place refers to the ability to live independently and comfortably in your own home, while assisted living provides a more structured environment with care and assistance provided by professionals. Aging in place allows you to maintain your independence and freedom, while assisted living may be necessary if you require more support and care.
The best way to avoid unexpected costs and delays is to create a detailed project plan and address any issues as soon as they arise. However, if you do encounter unexpected costs or delays, communicate with your contractor immediately and work together to find a solution. If necessary, consider hiring a mediator or filing a complaint with your state licensing board.
Some common scams include disappearing contractors who take your money and run, upfront payment scams where the contractor demands full payment before starting the work, and low-ball estimates that seem too good to be true. Always be wary of contractors who refuse to provide references or cannot provide proof of insurance and licenses.
Before hiring a contractor, check their credentials, ask for references, and read online reviews. It’s also important to ask for proof of insurance and licenses. A trustworthy contractor will be transparent about their experience, qualifications, and pricing. If something seems too good to be true, it probably is.
It depends on the scope of your project and your level of experience. If you’re planning a major renovation or if you’re not comfortable working with certain tools or materials, it’s best to hire a professional contractor. However, if you have experience and are comfortable tackling certain aspects of the project on your own, a combination of DIY and professional work may be the best approach.
The answer to this question depends on the scope of your project, your location, and local building codes. In general, if you’re doing any work that involves structural changes, electrical or plumbing work, or adding or removing walls, you will likely need a permit. Check with your local building department to find out what permits you need and how to obtain them.
Some common design mistakes to avoid include choosing trendy designs that may not stand the test of time, not considering the flow and functionality of the space, and neglecting lighting and storage needs. It’s also important to avoid over-personalizing the space, as this can make it less appealing to potential buyers if you choose to sell your home in the future.
There are many ways to save money on a kitchen remodel without sacrificing quality. Start by setting a realistic budget and sticking to it. Consider doing some of the work yourself, such as painting or installing light fixtures. Shop around for materials and appliances to get the best deals. And consider using lower-cost alternatives to high-end materials, such as laminate countertops instead of granite.
There is no one-size-fits-all answer to this question. It depends on the scope of your project, your budget, and your personal preferences. If you’re planning a major remodel that involves moving walls, plumbing, or electrical systems, it’s probably a good idea to hire an architect or designer to help you with the planning and permitting process. On the other hand, if you’re just replacing cabinets and countertops, you may not need professional help. Consider consulting with a designer or architect to see what they recommend for your specific project.
The best way to keep pests out of your home during the summer is to eliminate any sources of food, water, and shelter that may attract them. This includes sealing up any openings or cracks in your home’s exterior, removing standing water and debris from around your property, and storing food in sealed containers. If possible, move any bushes, shrubs, or flowers further from your home to mitigate moisture issues. If you have a serious pest problem, it may be necessary to hire a professional exterminator.
While you can certainly close your pool for the winter yourself, it’s a good idea to have a professional service it at least once a year to ensure that it’s in good working order. A professional can also perform any necessary repairs or upgrades to your pool’s equipment.
It’s a good idea to start preparing your lawn and garden for summer in the early spring, as soon as the ground thaws and temperatures start to warm up. This will give you plenty of time to mow, fertilize, and plant before the summer heat sets in.
While it’s always a good idea to have a professional inspect and service your air conditioning system, you can do some basic maintenance tasks yourself, such as changing air filters and cleaning the outdoor unit. However, if you suspect that your system has any serious issues, it’s best to leave the repairs to the professionals.
Yes, Darien is an accessible town that is open to visitors to admire its architectural heritage. You can join a guided tour or explore the town by yourself. Some of the best neighborhoods to see Darien’s architecture include the historic district on the Post Road and the Tokeneke area.
Darien takes great pride in preserving its architectural heritage. The town has established the Historic District Commission to regulate the preservation, restoration, and rehabilitation of the historic structures within its district. The town also offers financial incentives and tax credits for owners who restore or preserve their historic homes.
Some well-known examples of Darien’s architecture include the Mather Homestead, built in 1778, the Bates-Scofield Homestead, built in 1736, and the modernist Smith House built between 1965-1967 by Richard Meier.
Darien’s architecture is unique due to its diverse range of styles, from early Colonial homes to modernist houses. It tells the story of the town’s history, culture, and influences over the years. Darien’s architecture also stands out due to its commitment to preserving its heritage and character.
The cost of building a deck varies based on factors such as size, materials, and design. On average, you can expect to spend between $120 and $200 per square foot for a basic deck installation with labor and materials included. However, complex designs or high-end materials can increase the cost. Other costs include fees paid to designers and architects where drawn plans are needed, costs to pull permits based on your locality, and possibly overhead costs such as for a demolition dumpster or porta-potties for workers.
While it’s possible to install a deck yourself, hiring a professional is recommended, especially for larger or more complex projects. Professional deck builders have the necessary skills, experience, and tools to ensure a safe and well-constructed deck that complies with building codes. Depending on your location, your deck may require a permit to be pulled, which we would recommend hiring a contractor for.
There are several signs that indicate your deck may need repair. These include loose or rotting boards, wobbly handrails or stairs, visible cracks, or signs of water damage. If you notice any of these issues, it’s essential to address them promptly to prevent further damage and ensure the safety of your deck.
Yes, you can renovate an existing deck to update its appearance or enhance its functionality. Renovations can include replacing worn-out boards, upgrading the railing system, adding built-in seating or lighting, or expanding the deck’s size. Assess your deck’s condition and consult with a professional to determine the best renovation options for your specific needs.
Yes, homeowners can perform work on their own property without a contractor’s license in Connecticut. However, if the work requires a permit, such as electrical or plumbing work, homeowners may need to obtain the appropriate licenses or hire a licensed contractor. Additionally, homeowners may not hire unlicensed contractors to perform work on their property.
If you suspect that a contractor is unlicensed or uninsured, you should report them to the Department of Consumer Protection immediately. You can file a complaint online or by calling the department’s hotline. Keep all the documentation and communication related to the project and contact an attorney if necessary.
Contractors in Connecticut should have liability insurance, workers’ compensation insurance, and commercial auto insurance if they use their vehicle for work-related purposes. Liability insurance provides protection against property damage and personal injury claims, while workers’ compensation insurance covers medical expenses and lost wages in case of on-the-job injuries.
To check if a contractor is licensed in Connecticut, you can visit the Department of Consumer Protection website and search for the license number or the contractor’s name. You can also call the department’s licensing division directly to verify a contractor’s license.
Absolutely! Basement remodels are a fantastic way to transform unused space into functional living areas. With proper planning and design, you can create a cozy and comfortable room for various purposes.
Yes, permits are typically required for basement remodels in Connecticut. It’s essential to check with your local building department to ensure compliance with all necessary regulations and obtain the required permits before starting the project.
The duration of a basement remodel depends on various factors, including the size of the space, complexity of the project, and any unforeseen issues. On average, a basement remodel can take anywhere from a few weeks to several months. Common factors that increase the time required include delays waiting for permits, time spent waiting for materials to arrive, and delays while homeowners select fixtures and finishes.
Yes, adding a bathroom to your basement renovation project can have a significant impact on the overall cost. The addition of a bathroom involves additional plumbing work, fixtures, and finishing, which can increase the expenses. On average, including a bathroom in your basement remodel can add approximately $15,000 to $25,000 to the total cost, depending on the complexity of the installation and the chosen fixtures.
The average cost of a basement remodel in Connecticut can vary based on various factors such as the size of the basement, the complexity of the project, and the quality of materials used. On average, homeowners can expect to spend between $50,000 and $80,000 for a basement renovation in Connecticut. It’s important to obtain multiple quotes from contractors to get a more accurate estimate based on your specific requirements.
Keeping up with regular maintenance is essential to protecting your investment in your home. Create a maintenance schedule and stick to it, including tasks like cleaning gutters and chimneys, inspecting your roof, and servicing your HVAC system. Regular cleaning and upkeep of your home’s features, such as appliances and fixtures, can also help extend their lifespan and keep them looking and functioning like new.
To protect yourself, always research contractors carefully and ask for references and proof of insurance. Get multiple bids for your project to ensure you’re getting a fair price, and never pay for the entire project upfront. Be wary of contractors who pressure you to sign contracts quickly or who ask for cash payments.
Not necessarily. While some home improvement projects may require the expertise of a professional contractor, many can be completed by homeowners with basic skills and tools. Always weigh the risks and benefits of DIY versus hiring a contractor, and don’t be afraid to ask for advice from professionals or online resources. For further reading, check our guide on when to hire an interior designer.
Addition is put on the production schedule!
- Retainer received by Fine Home Contracting $5,000
- Project Manager assigned by Fine Home Contracting
- Plans are drawn and reviewed to keep within budget
- Reviews and changes made as necessary
- Final plans submitted for review to Town/City
- Total price is proposed and contract is signed
- Deposit is received
- Permits are applied for with Town/City
Basic square foot pricing to estimate a total allowance of costs ($500- $800 per Sqft)
Additional Cost Items are estimated and include:
- Septic Upgrade
- HVAC Upgrade
- Electrical Service Upgrade
- Grading and Driveways
- Connection to existing house
- Reroof entire house if connection intersects existing roof
- New Siding / Paint entire house if deemed necessary
Preliminary research to see if an addition can be added to the property including:
- Property Setbacks
- Septic and Well Placement if not connected to City utilities
- Buyer Finds a House:
The process starts with a buyer finding a house that “just needs something” or may require certain items to be fixed before it can be eligible for financing. - Mandatory Repair Items:
For limited 203ks a home inspection is accepted. However, for 203k (35k++) you need a HUD Consultant. The deficient items on the report will need to be repaired to be eligible for financing (typically these are health and safety). - Wish List (kitchens etc.):
Next, the contractor reviews the property, goes over the mandatory repair list and adds WISH LIST items. - Contractor Quote:
Each line item of work that needs to be done must be itemized with materials and labor costs separated. - Packet to Lender:
A packet will be sent to the lender including the consultant write-up, contractor write-up, contracts, permits required, contractor resume, W2, License, and Insurance information. - Appraisal:
Since the appraisal may uncover additional deficiencies, it is important that the original inspection and work write up includes everything. Renovation costs are added to the value of the house (with certain restrictions). - Lender Processing:
At this point in the process the inspection report, appraisal, and write-ups will be processed and verified. These documents all need to contain the same mandatory repair list. - Closing:
Buyers should be aware that closing can sometimes be delayed, so they may need to wait until work is completed before they can move in. - Work Starts:
HUD wants work to start in 30 days, but permits will need to be issued which usually takes 1-2 weeks - Progress Inspection:
The HUD consultant will make routine progress inspections and submit draws to the lender who will then issue payment to the contractor. - Move In:
You are now all set to move in!
- Installing new flooring
- Removing a load-bearing wall
- Installing solar panels
- Plumbing and electrical updates or repairs
- 50% Debt-to-Income Ratio
- 640 Min. Credit Score
- 2 Recent Paystubs
- List of Total Assets
- List of Total Debts
- Mortgage Insurance
- Independent Appraisal
A Homestyle loan is a long-term financing option available to owner-occupied homeowners and buy-and-hold investors that can be used to purchase and renovate a primary residence. This permanent mortgage is backed by Fannie Mae, and typically funds between 65% – 95% of a property’s price and renovations. In order to have their renovation budget approved borrowers must submit a detailed list of repairs, 2-3 licensed contractor bids from approved contractors, and a licensed contractor to oversee the renovations.
- Remodeling of Kitchens & Bathrooms
- Stabilizing Lead-Based Paint if detected
- Installation of Roofs, Gutters, and Downspouts
- Installation or repair Exterior Decks, Patios, Porches
- Installation of New Windows, Doors and Siding
- Remediation of Health and Safety Issues (Mold)
- Installation or Repair of Plumbing, Well And/Or Septic System.
- Installation of Fencing, Walkways, Driveways, and Landscaping
- Installation of New Energy Efficient Heating Systems, and Electrical Service Upgrades
- Replace Missing Or Stolen Pipes
- There Are No Limit On Repairs
- Any Structural Work Is Allowed
- A Minimum of $5,000 Borrowed For Repairs-
- A Maximum 110% After The Appraised Value
- A HUD Consultant Is Required
- A Minimum Borrowed of $5,000 for repairs
- A Maximum Borrowed of $35,000 for repairs- (this ends up to be around 30k for the renovation- for most lenders)
- There is a Limited On Some Types Of Repairs. (structural)
- A HUD Consultant Is Not Required But We Recommend It
The FHA 203k loan is a renovation or construction loan, that is backed by the Federal Housing Administration. Both buyers and refinancing customers can combine the traditional “home improvement” loan with a standard FHA mortgage, which allows the homeowners to borrow their renovation costs.
The better we plan the smoother your renovation process. Before the first swing of a hammer, we carefully create your renovation timeline, submit all the required city permit applications and make sure you’re 100% satisfied with your design selections.
Coordinating purchases and deliveries can be cumbersome. Your dedicated Project Management team and designer work with our procurement specialist to ensure all fixtures and material arrive safely and on time.
Unlike most other GC’s we not only own the sales and management process, we have carpenters, tile installers, plumbers, electricians and painters on staff. We can control the speed and quality of every project start to finish.
Our experts guide you through the ins and outs of the process. They’ll help you make smart layout and fixture selections. 3D Renderings help you visualize your dream space.
City permitting, material procurement and schedule coordination can be challenging. A dedicated Project Manager will ensure your project stays on schedule and on budget.
Our library of curated plumbing and electrical fixtures, cabinetry, flooring and tile selections means countless options for any budget. The lumber, sheetrock, wire and pipe are the unsung heroes; we’ve got you covered there too.
Even modest renovations need carpenters, electricians, plumbers, tilers and painters. Good contractors are hard to find and ours are fully licensed, insured and vetted.